|
Ear and Ear Butts Instructions:
In this taxidermy "how to" article we will discuss installing plastic earliners in a whitetail deer and building ear butts out of clay. Van Dyke’s offers very good plastic earliners with the butt built in for ears in the forward position. The method discussed here will allow you to position the ears in any attitude that you so choose and give very accurate ear butt anatomy.
Here is a complete list of what we recommend for setting ears using this technique. (Photo 1) Critter Clay, lacquer thinner, earliners, 15 minute Bond-Tite, Stout Ruffer, Piranta trophy skinner, or any scalpel, Slow Set Super Glue Gel, Super Glue Accelerator and an ordinary Dryer Sheet.
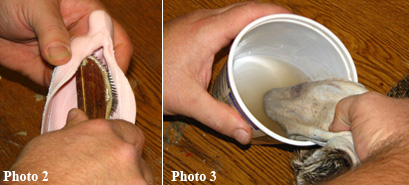
Start by thoroughly scuffing up the earliner inside and out with the Stout Ruffer. (Photo 2) Pour some lacquer thinner into a plastic container and dip the inverted ear skin into the thinner. (Photo 3)
Optional: You can also dip the earliner into the thinner. This will further etch the plastic and soften it. DO NOT LEAVE THE EARLINER SOAKING IN THE THINNER! A quick dip is all that is necessary. Set the earliner aside until the plastic firms up before proceeding. (Another option to help adhesion is to drill or punch a series of holes in the earliner. This allows the adhesive from both sides of the ear skin to “lock” together and the holes in the liner will not be noticeable)
Blot the ear skin with a paper towel to dry it (Photo 4) and inspect the ear skin for any holes. Large holes must be sewed, but smaller ones can be repaired with the following technique. With a scalpel cut a patch out of the dryer sheet that is slightly larger than the hole. (Photo 5)
Run a small bead of Super Glue around the edge of the hole using care to not get any in the hair. (Photo 6)
Place the patch in place (Photo 7) and spray with the Accelerator. (Photo 8) Mix up equal amounts of Bond-Tite approximately equivalent to the size of a 50 cent piece and mix thoroughly to a uniform color with no streaks.(Photo 9)
Turn the ear skin hair side out and form a pocket. Place a thin layer of adhesive in this pocket (Photo 10) in the upper half of the tip end only, then coat the earliner with a thin coat, inside and out. (Photo 11)
Don’t coat the “ball end” so you will have a place to hold on to. Slide the liner in to the skin (Photo 12) and “taxi” the skin into place (Photo 13).
The Stout Ruffer makes an excellent tool to latch onto the skin to help slide it into place. (Photo 14) Squeeze the skin until you have the adhesive spread evenly over the entire earliner. When you are satisfied that the skin is aligned properly, use a brass grooming brush to comb the hair in to place. (Photo 15) Make sure the skin is fitting properly in the deepest part of the ear. (Photo 16) Do the other ear and then set aside until the adhesive sets up, usually in 15 – 20 minutes.
You are now ready to form the ear butt. Start by rolling out equal rolls of Critter Clay, approximately cigar size. (Photo 17) Peel the skin back from the liner approximately 1” and place the roll of clay completely around the earliner. (Photo 18)
Now, push the clay down into the skin (Photo 19) and blend the clay to the earliner through the skin. (Photo 20)
Rough shape the ear in the back position (Photo 21). Using Reference photos showing ear anatomy greatly helps. The ears are now ready. (Photo 22) shows the mount with the left ear in the back position.
(Photo 23) shows the right ear in the forward position. The right ear was initially posed in the back position and brought forward after the incision was sewed up. Only a small amount of clay was added during the mounting process to blend the existing clay in the earliners to the form and skull plate. After the ears were posed, the clay was blended by pushing on the skin, making sure there were no bulges or voids. (Photo 24) shows the backs of the ear butts after they were finished.
TIP: The width of the ear butt from top to bottom should be approximately the same as the width of the widest part of the blade of the ear top to bottom. (Photo below)
Go Back

|