|
Skinning and Caping the Whitetail Deer for a Shoulder Mount
The key to a great mount is proper cape preparation-this begins as soon as the deer hits the ground!
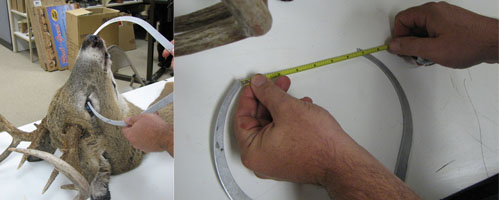
The first thing you want to do when caping out a head for a shoulder mount is to make sure you leave enough skin. As a general rule, if you leave a least 6 inches behind the front legs you will have plenty. When you have a lot of repair work to do such as bullet holes, drag marks or fighting scars it is a good idea to leave about a foot of extra skin. You can always trim off what you do not need but it is almost impossible to put skin back and have a quality mount. When you have figured out how far back you need to cut the skin, simply cut a ring around the animal and make a cut up the back of the front legs following where the white and brown hair meet from the knee to the cut around the body. Now just tube skin the shoulders and neck like taking off a sock to the base of the skull. Measure and record the neck circumference of the carcass tight to the head and also the circumference 3 inches below the ears crossing the atlas vertebrae. These measurements will aid you when ordering the correct form.

Before starting to skin the head, you will need to make your eye to nose measurement. The best and most accurate way to get this measurement is to use a caliper. Place one end on the center of the deer’s nose and put the other end right up against the front corner of the eye. Now take a good steel tape and measure the distance. Be sure to record your measurements. The eye to nose measurement is the most critical but you may also want to measure the back of the head to the nose and the antler tip to nose for a reference when setting the antlers on the form.
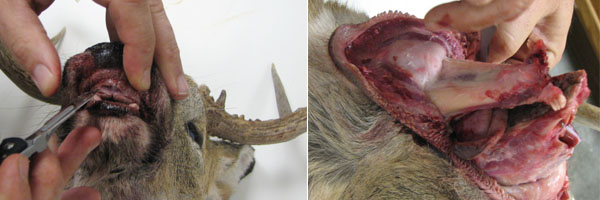
With the first step of skinning the head, you must begin by cutting the skin around the gum line. It is important to cut as close to the gum as possible leaving plenty of lip skin to tuck. Carefully cut the skin away from the gums and peel it back. When you get to the nose cut around the palate as close as possible and cut through the septum back to the bridge of the nose and peel it back.
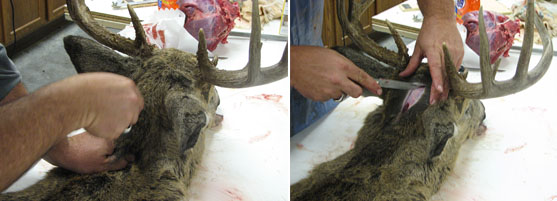
The next incision you will need to make is straight up the back of the head. We try to keep this cut as short as possible; just big enough to get the skull out. Some people like to cut it all the way down the back and it is really a matter of personal preference. You also have the choice of either a Y-cut or a T-cut, the only difference being where you base the incision.
The Y-cut would begin behind the antlers making a Y shape to each antler and the T cut would be a straight cut between the antlers. After you have made the cut of your choice, cut the skin right up to the base of the antler burr. Van Dyke’s sharp point knife works exceptionally well for this. Once you have the skin started you can also use a flat head screwdriver to get the skin loosened. You must be careful to get it as close as possible so you don’t leave any skin attached.
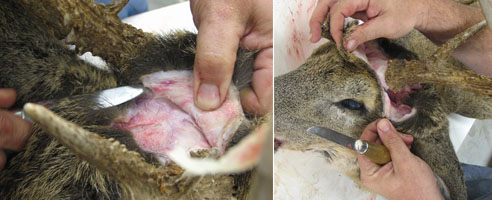
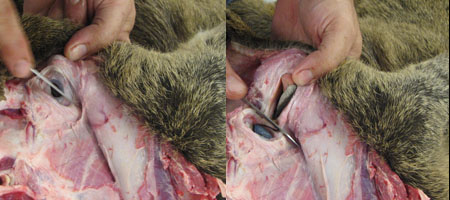
As you skin the head, be careful when you get to the ears. Try to cut the ear canal loose as close to the skull as possible. Cutting it too high can cause results that would be hard to repair and greatly affect the mounting process.
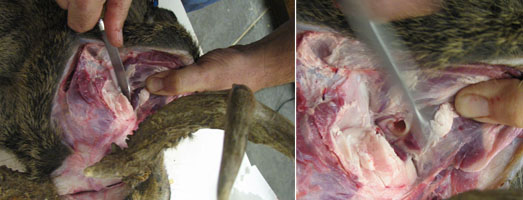
When you are free of the antlers continue to skin the head down to the to the back of the eye socket. This is the one spot that gets damaged the most but, if you follow a few basic procedures, and take your time, it is not hard at all. The first thing you want to do is insert your index finger into the back of the eye socket then start skinning the eye down keeping the cutting edge of your knife behind your finger. This will keep you from cutting the eye lids. When you reach the front of the eye, get your blade right down on the skull and continue peeling the skin loose of the tear duct. Now that you have made it through the eye and tear duct, continue to skin down until you reach the already skinned area on the muzzle. You should now be able to remove the cape from the skull. The cape is now ready to freeze or prep, salt and tan.


Go Back

|